+91-80-30573333      artica@indiapaper.com
  Six decades of paper work, but we loved every minute of it.  
 
Customers Grow, We Grow
TROUBLE SHOOT


Sheetfed offset printers

BACKING BACK TRAP MOTTLE CHALKING
DRYING FADED COLOR GHOSTING, GLOSS
GHOSTING MECHANICAL GLOSS GRAY AND WEAK SOLIDS
HICKIES INK / WATER BALANCE MILEAGE
MOTTLED SOLIDS MUDDY HALFTONES PICKING / LINTING
PILING PLATE BINDING PLATE WEAR
REGISTER ROLLER STRIPPING RUBBING AND SCUFFING
SCUMMING SET - OFF / BLOCKING SLINGING
SLURRED OR DOUBLE IMAGE TINTING / TONING TRAPPING
INCONSISTENT COLOR REPRODUCTION CRYSTALLIZATION DOT SHARPNESS

Problem Cause Solution

BACKING
New ink fails to flow and replace ink removed by fountain roller. resulting in progressively lighter
color
Insufficient in fountain, or ink is too thixotropic. Add more ink in fountain with knife to keep it fluid.
Ink too short and buttery. Consult ink manufacturer to reformulate ink for better flow.

Problem Cause Solution

BACK TRAP MOTTLE
Ink is pulled from the printed surface (back trapped) on to the blanket as the sheet passes through successive printing nips, creating a mottle image.
Fast setting work and turn inks. Use a more stable, slower drying ink with a lower solvent content.
Critical inks (usually dark colors or cyan and magenta) are printed in the first and second units. Change ink sequence.
Poor layout or sequence. (Solid is overprinted in another solid or a screen tint.) Change layout and / or sequence if possible to print lighter.
Improper tack sequence. Use tack graded inks, and print the highest tack first, the lowest tack last; or use properly formulated uniform tack inks.
Ink is drying during long make readies. Clean press to shorten make ready time.
Excessive ink solvent evaporation due to fast press speed. Reduce press speed and use fresh ink.
Certain gloss coated sheets have a high potential for back trap. Try other stocks.
Press design; the greater the distance from the first to last printing until, the greater the potential for mottle. Change printing sequence if possible.
Excessive paper - to - blanket squeeze. Reset to manufacturer's specification.
Certain compressible blankets. Change to quick release conventional blankets with high solvent resistance.

Problem Cause Solution

CHALKING
Ink pigment does not bind to stock
Too much vehicle has penetrated stock too fast. Use overprint varnish or a sealing size to bind ink to paper.
Ink does not contain enough drier for stock involved. Consult ink manufacturer to formulate ink for stock.
Stock too acidic, causing slow drying. Consult ink manufacturer to formulate ink for stock, or change stocks.
Ink film too thin (strong). Consult ink manufacturer to adjust ink for less strength.
Fountain solution pH too low. Adjust fountain solution to higher pH.
Ink too soft, providing no hold - out. Consult ink manufacturer to reformulate ink for more hold - out.

Problem Cause Solution

INCONSISTENT COLOR REPRODUCTION
Proofing substrate does not match printing substrate. Paper press proofs area different brightness than printing substrate. Consult manufacturer to adjust color hue and hold out of ink to match the proof. If a change in printing substrate is possible, attempt to closely duplicate the proofing substrate.
Process color prints do not match supplied proofs.

a) Consult color separator to determine what ink hue is best or reproduction of the supplied proof.

b) Obtain a new color separation prepared for condition of press room. This may be done by providing color separator with printed samples of previousjobs which exhibit typical inks and production standards realistically reproducible.

ac) Establish standard procedures. Attempts to make the job on press lead to color variation. All phases of color separation, pre-press and press operations must be carefully coordinated.

Special, spot color does not match proof. Consult ink manufacturer.
Different Pantane Color Formula Guides. The Pentane color formula Guides are reproductions of colors and subject to variations. If exact matches are required, the printer's customer, the printer and ink manufacturer must all use the same Formula Guide.

Problem Cause Solution

CRYSTALLIZATION
Succeeding colors do not adhere to previously dried ink.
Initial ink film is high in hard waxes. Consult ink manufacturer to formulate succeeding inks for better lay.
Too long a delay between first and succeeding colors. Run succeeding colors as quickly as possible. If job requires imprinting later leave area blank so later colors are printed on plain paper.
Excessive spray powder used on initial colors prevents adhesion. Handwipe prints to remove excess powder.
Dry inks colors have formed a hard continuous film. Consult ink manufacturer to add solvent to succeeding inks to soften previously printed colors for better adhesion.
Initial ink film contains too much drier. Consult ink manufacturer to reformulate ink.
Too much heat generated by infra - red dryer forms a hard film. Reduce drying temperature.

Problem Cause Solution

DOT SHARPNESS
Printed screens and reverses are plugged, appearing muddied, and show higher values than the "prog" proof shows
Too much form roller-to-plate, plate -to-blanket, or blanket -to-blanket pressure. Check setting and correct to proper pressure.
Doubled or slurred dots. See SLURRED OR DOUBLE IMAGE.
Ink body is too long and is squashing at the point of impression. Consult ink manufacturer and have provide stiffer ink.
Ink is too water receptive. Consult ink manufacturer.
Poorly ground ink. Consult ink manufacturer and have ink reworked.
Piling. See PILLING.
Plate was not sharp enough to compensate for normal dot spread from film to plate to press. Have cameraman and plate maker cooperative in making sharper halftones, negatives, positives, and plates.
Plate poorly desensitized causing image coating between halftones to print. Desensitize or remake plate.
Insufficient dampening solution. Increase dampening solution to cover plate evenly. Check or dirty dampener cover; replace if necessary.
Ink roller train is carrying too much ink. Reduce ink and reduce water.
Blankets or rollers too soft. Recondition blankets or rollers; replace if necessary.
Blankets packed incorrectly Check packing.

Problem Cause Solution

DRYING
Ink film remains wet or tacky in the touch
Ink is taking on too much water. Adjust ink/ water balance; consult ink manufacturer for proper adjustment.
Ink film thickness excessive. Run less ink or consult ink manufacturer to increase strength for this purpose.
Plate dampening is uneven. Keep dampeners clean and clean from accumulated dirt. Prevent drafts, check windows, vents, and forced air system.
Stock is not porous enough or has too high water content. Switch stock to correct porosity or water content.
PH/conductivity of fountain solution is incorrect. Check pH/ conductivity and adjust to 4.0 - 4.5 pH.
Ink not formulated for the stock. Consult ink manufacturer.
Insufficient air/ oxygen circulation. Wind sheets between printing and other operation. Use anti- set- off spray to keep sheets apart. Imprevious sheets such as plastic and foil should be kept in small lifts, slip sheetfed or winded frequently.
Relative humidity is too high. Control Pressroom humidity.

Problem Cause Solution

FADED COLOR
Color is lost during drying or when exposed to light usually in large solids or solid tints.
Insufficient oxygen for complete drying causes oxidation of pigments, bleaching or burning them out. Consult ink manufacturer. If pigments are susceptible to oxidation, intermittently wind the sheets during the first few hours after printing.
Ink pigments are especially susceptible to fading. Where light fastness is important, consult ink manufacturer about using permanent pigments.

Problem Cause Solution

GHOSTING, GLOSS
(Also called CHEMICAL or GAS GHOSTING) A large solid on the back-up side of a sheet shows excessive gloss opposite the ink on the side printed first.
Large solids printed on a back - up form. Print the heavy form first, and the light form on the back up side.
Large lifts. Run small lifts when backing up the sheets.
The first side is backed-up too soon after it is rum. Hold lifts three days ( per GATF ) before printing back-up side.
Glossy sheetfeld inks. Wind sheets before printing back up side. Keep lifts in sequence for back up. Keep lifts away from sources of excessive heat or cold.Run sheets through the press without printing to supply fresh air before the back up side is printed. On small expensive runs, slip - sheet the stock while printing the second side.

Problem Cause Solution

GHOSTING MECHANICAL
A light to dark print of another part of the form appears in large solids of dense halftone
Poor Layout. Improve layout.
Ink film too thin. Consult ink manufacturer to weaken ink so a heavier ink film may be carried.
Ink too transparent. Consult ink manufacturer to make ink opaque, if possible.

Problem Cause Solution

GLOSS
(POOR) There is a decrease in the normal reflection of light from the dried ink surface
Paper too ink absorbent. Paper surface too rough and grainy has poor gloss. Consult paper manufacturer to obtain stock with more ink hold out Obtain stock with smoother surface better gloss.
Press dampeners (too much water being introduced in to inking system). Cut back on amount of fountain solution used. Consult ink manufacturer to decrease water receptivity of ink.
Ink film thickness too low. Increase ink film thickness.

Problem Cause Solution

GRAY AND WEAK SOLIDS
Solids appear weak, lack density

Improper ink and water balance.

Adjust to proper ink and water balance.
Improper concentration of fountain solution. Check fountain solution and adjust to proper pH/ conductivity.
Non-uniform dampening. Check condition of brushes flicker blades etc.; clean or replace.

Loss of image area.

NOTE : Additional solution to correct gray and weak solid.

See PLATE WEAR.

Check for improperly set form rollers.


Problem Cause Solution

HICKIES
Blemishes in the printed ink film

HICKLES WITH DARK FILLED OR OPEN GOUGHNUT SHAPED CENTERS -

Generally indicate presence of a particulate.

 
Dried ink particles. Avoid skin when removing ink from cans or kits. Protect against skin formation by placing a sheet of waxed paper on the surface. Clean the press thoroughly and prevent fresh ink from mixing with dried ink around the fountain edges. Eliminate caking on ends of rollers by regular manual washing.
Roller particles. Recondition rollers and drums. Scrub rollers with pumice water and blanket wash to remove dried ink, water soluble gum deposits and glaze. Work drums with petroleum jelly to remove surface oxidation or rust. Replace worn or disintegrating rollers as needed.
Dampener cover particles. Replace suspect sleeves or rollers as needed.
Plate particles. Check plates for loose coatings or aluminum shaving from packages. Make certain coating have been completely removed during processing.
Foreign particles. Inspect pressroom and press for cleanliness. Check heating and air conditioning systems for circulation of dust or particulates. Vacuum surface or overhead fixtures such as lights. Hang Plastic sheeting over the press to catch falling particles. Reduce application of spray power.
HICKIES WITH OPEN PINHOLE CENTERS - indicate paper may be involved.  
Loose paper coating or dust Check incoming paper. Vacuum edges before feeding in to the press. Install sheet cleaning devices.
Old, used, or tacky ink. May pull coating from paper. Consult your ink manufacturer to adjust tack and / or viscosity of ink.
Excessive dampening solution ma lift coatings from sheets. Reduce setting or dampening system. Also see INK / WATER BALANCE. Note : Properly maintained hickie - picker rollers do work. Teflon shrink wrapped rider rollers leather covered or gained rubber may be used effectively All type require frequent scrubbing for optimum performance.

Problem Cause Solution

INK / WATER BALANCE
Frequent adjustment required on press to maintain print quality
Excessive fountain solution. ("Orange peel effect " occurs in solid areas of print.) Reduce dampener settings. Isopropyl alcohol or an alcohol replacement can help reduce amount of fountain solution required to keep plate clean .
Fountain solution mixed too strong. (commonly seen as washed out looking color.) Ink will readily emulsify. Adjust pH to a 4.0 - 4.5 range.
Fountain solution too weak, (commonly seen in solid areas as print as " poor ink lay" or " orange peel effect ".) Increase fountain concentrate in solution to 4.0 - 4.5 range.
Improper dampening Roller setting. Reset rollers. Be sure dampener form rollers are driven by the vibrator roller and not the plate.
Improper ink form roller setting. Conduct ink stripe test to check form roller pressure.
Improper ink fountain Settings. Adjust the amount of ink at fountain. Allow adequate time for adjustment to take full effect.
Weak ink, i.e. low color strength. Consult ink manufacturer for proper adjustment.
Ink taking up too much water. Consult ink manufacturer.

Problem Cause Solution

MILEAGE
More ink used per impression than normal
Lack of control on color densities. Adjust color densities to minimum, consistent with satisfactory print quality.
Ink penetration into stock too rapid. Consult ink manufacturer for ink with more hold -out. Change to less porous stock.
Improper ink and water balance. Reduce amount of water carried.
Low pigmented inks. Consult ink manufacturer for proper tinctorial strength.
Excessive waste at start up of run. Improve start - up procedures.
Improper estimate of coverage from job to job. Establish ink usage history so that these figures can be used to more accurately predict ink usage.

Problem Cause Solution

MOTTLED SOLIDS
Printed solid area is not uniform (smooth) ink appearance or density.
Stock has non - uniform surface formation. Get better grade of paper. Consult ink manufacturer to provide weaker ink and minimize and penetrating tendencies.
Too much printing pressure. Reduce printing pressure.
Improperly set ink form roller or roller ink poor condition. Check condition and reset ink from roller to specification.
Improper ink and water balance. Adjust to paper ink and water balance.
Blanket has not been changed for a long time and has become worn and rough in certain areas. Replace with a new blanket.

Problem Cause Solution

MUDDY HALFTONES
Halftones lack sharpness in highlight areas.
Excessive ink being applied to the plate. Reduce ink.
Poor materials for good reproduction. Check reproduction process.
Plate improperly processed. Re - check exposure using Gray scale (Stouffer scale).
Excessive linting. See PICKING/ LINTING.
Improper form roller settings. Adjust setting to Manufacturer's specification.
Improper ink and water balance. Note : Additional solutions to correct Muddy Appearance of Halftones. Adjust to proper ink and water balance. Check for glazed blanket.

Problem Cause Solution

PICKING / LINTING

PICKING - Lifting of the coating from coated stocks onto blankets, plates or rollers.

LINTING - Pulling fibers uncoated stock
Too much water reaching papers. Reduce dampener setting for proper performance.
Paper surface trash, coating dust, slitter or trimmer dust. Make tape pulls from blanket, consult paper manufacturer.
Base stock picks. If serious, reject paper, change to more lint or pick - resistant stock.
Pressure set too high for ink/ stock combination being used. Reduce impression pressure, repack to manufacturer specifications.
Blankets is too tacky. Consult blanket manufacturer. Treat blanket or change to a less tacky blanket. Check blanket wash.
Ink is too tacky for stock being run. Consult ink manufacturer to lower tack of ink.

Problem Cause Solution


PILING
Build o paper coating, lint or ink on rollers, blankets or plates

PAPER :

See PICKING / LINTING

INK :

See PICKING / LINTING
Ink is water logged due to insufficient body or tack. Reduce dampener settings. Consult ink manufacturer.
Ink is poorly ground, contains a coarse heavy pigment. Consult ink manufacturer. Have ink reworked or reformulated.
Improper packing of cylinders or rollers not set correctly. Check specifications and adjust it necessary.

Problem Cause Solution

PLATE BINDING
(LOSS OF IMAGE) Part or all of image on plate does not take ink
MECHANICAL :  
Excessive amount of lint being deposited on place. Refer to PICKING/ LINTING
Excessive plate - to - blanket pressure causing plate wear. Re-set to specification. Use packing gauge to check pressure.
Improperly set ink and dampening form rollers. Roller could be to hard check durometer. Also check setting; re-set if too much pressure exists.
Abrasive particles destroying image. Check ink grind, fountain solution, solvents, etc. Replace all contaminated material.
CHEMICAL :  
Too much acid in the fountain solution. Check pH/ conductivity and adjust to 4.0 - 4.5 pH.
Too much gum in fountain solution. Re - etch plate and rub up image areas with press ink. Drain fountain solution and refill with tap water. If image returns, replace tap water with fountain solution containing less gum.
Plate cleaners and / or scratch removers have dried on plate image. Always rinse plate thoroughly and immediately after using such item.
Detergent remains or has somehow entered the fountain system. Make sure that all parts that comes in contact with cleaning detergent have been thoroughly rinsed before reinstalling in press.
Ink will not adhere to image area due to excess amount of fountain solution being accepted by the ink. Reduce dampener setting to minimum, if problem persist consult ink manufacturer.
Plate not completely developed; gum remains on image areas. Wash plate. If problem persist have plate remade.

Problem Cause Solution

PLATE WEAR
Gradual loss of image area.
Improperly processed plates. Check plate developing process include Stouffer scale. Check for excess Diazo on plate preventing complete development.
Ink and / or water form rollers improperly set. Adjust to manufacturer's specification.
Excessive linting. See PICKING / LINING.
Fountain solution too concentrated. Check conductivity and reduce to proper amount.
Improperly packed plate and blanket cylinders. Check with Colight or Baldwin guage and set to manufacturer's specification.
Running plate far beyond their capabilities. Switch to higher quality plate which will result in longer plate life.
Using extremely strong inks - starvation of image area. Reduce strength of inks to improve plate lubrication.
Extremely poor grind of ink. Consult ink manufacturer to check ink grind.
Form rollers too hard. Replace form rollers.

Problem Cause Solution

REGISTER
After the press has beeb set for proper registration, some condition prevention consistently good register, either in the press running direction, or side -to-side
Register problems can be caused by poor alignment of press, plate, blanket, paper or film. If after checking these elements the problem persists, contact our press supplier.

Problem Cause Solution

ROLLER STRIPPING
Rollers do not accept inks.
Fountain solution too acid. Check pH/ conductivity level and adjust to 4.0 - 4.5 pH.
Too much water being run. Reduce dampener setting.
Desensitized metal vibrator rollers. Clean rollers, copperize, wash thoroughly. Then ink rollers and wash again.
Glazed form roller. Remove rollers from press and deglaze per manufacturer's procedures. Rinse thoroughly.
Excessive gum in fountain solution. Copperize rollers. Use less gum in fountain solution. Too much gum combined with too much acidity can cause gum to precipitate on to rollers.
Ink too strong. Consult ink manufacturer for adjustment.
Ink too water resistant. Consult ink manufacturer for adjustment.

Problem Cause Solution

RUBBING AND SCUFFING
Printed ink film appears dry but exhibits poor rub and / or scratch resistance when abraded
Too much water run on job or paper contains too much water. Reduce dampener settings. Change paper.
pH of fountain solution too high. Check pH/conductivity and adjust to 4.0 - 4.5 pH.
Ink not fully dry. See DRYING.
Roughness of paper surface creates poor rub between un printed paper surface and printed paper surface (e.g. some dull coat type stocks). Consult ink manufacturer to provide ink with better rub resistance.
Too much ink. Lower level of ink carried.
Ink is not properly formulated or rub resistance. Consult ink manufacturer for adjustment.
Insufficient binding vehicle in ink. Consult ink manufacturer for adjustment.

Problem Cause Solution

SCUMMING
The non - image area of lithographic plate accepting ink random area.
Low alcohol content in dampening system. Bring alcohol content to correct concentration.
Glazed blanket, ink rollers, or dampening rollers. Clean thoroughly and recondition per manufacturer's instruction.
Excessive printing pressure. Make on - press adjustment to proper pressures.
Ink body too greasy; ink spreading in to non - printing area. Consult ink manufacturer to assure ink is on standard reformulate if necessary.
Plate improperly exposed to light after being allowed to dry. Desensitizer or remake plate.
High dichromate fountain solution. Check fountain solution and adjust accordingly.
Ink too soft. Replace with stiffer ink or consult ink manufacturer to reformulate if for heavier body.
Fountain solution pH out of balance. Check fountain solution pH/ conductivity and adjust to 4.0 - 4.5 pH.
Poorly adjusted or warn dampening rollers. Adjust pressure to specification; replace cover.
Overheated ink rollers. Check for warn bearings, adjust roller pressure if necessary.

Problem Cause Solution

SET - OFF / BLOCKING
SET - OFF - Ink transfer to the back side of the sheet on top of it.
BLOCKING
Sheets in a bundle or load stick together
Ink too slow setting. See DRYING.
Insufficient spray powder. Increase powder application.
Lift too heavy. Run shorter lifts; tray the lifts.
Rough handling of loads Do not drop or jack loads.

Problem Cause Solution

SLINGING
Ink being thrown from rollers or filaments
Too much in on rollers. Make press adjustment to decrease amount of ink carried. Consult ink manufacturer to increase ink strength and carry less ink on rollers.
Improper ink and water balance, resulting in emulsification. Adjust ink an water balance.
Ink is too long in body. Consult ink manufacturer.
Rollers are incorrectly set or in poor condition. Reset rollers based on manufactured's specifications. Replace rollers if in poor condition.

Problem Cause Solution

SLURRED OR DOUBLE IMAGE
Dots have shadows, and reverse letters fill in.
SLURRED IMAGE - dots appear elongated or smeared, occurs on a single unit.  
Over or under packed cylinders, resulting in different speeds between cylinders, causing slippage. Adjust packing to equalize diameters of cylinders.
Lose, uneven or soft blanket. Tighten blanket clamps, adjust packing or replace blanket.
Excessive play in gears and debearing of plate and blanket cylinders. Adjust according to manufacturer's specification.
Too much pressures between plate and blanket cylinders when running smooth plates at high speeds. Use "Kiss " impression, check form roller stripe or uniformity and width.
Running too much ink on coated stock. Reduce amount of ink, then adjust water feed if necessary to maintain color density.
DOUBLE IMAGE - Second image appears along side first; occurs on multiple units.  
Improper slipper settings. Adjust packing to equalize diameters of cylinders.
Unstable paper: paper is tanning in successive units. Check ink / water balance; adjust water to minimum possible.
Loose plate. Check plate and secure.
Loose blanket. Tighten blanket clamps, adjust packing or replace blanket.

Problem Cause Solution

TINTING / TONING
Fine particles of ink transmitted by press water dampener to non - image areas of plate
Ink bleeding in to fountain solution. Check concentration of alcohol or alcohol substitute in fountain solution. Consult ink manufacturer to reformulate .
Improper fountain solution concentration. Check pH/ conductivity and adjust to 4.0 - 4.5 pH.
Improper ink and water balance. Adjust to proper ink and water balance.
Too much pressure between plate and blanket. Check and re- set to manufacturer's specification.
Improper setting or durometer of dampener or ink rollers. Check and re - set rollers to manufacturer's specification; if rollers are old, check durometer.
Ink not sufficiently water resistant. Consult ink manufacturer to be sure ink is on-standard. Reformulate if necessary.
Plate improperly exposed, developed. Check platemaking procedure; correct if necessary.
Prolonged use of a detergent, wash - up solution. Wash up, remove detergent with water or petroleum solvent and change solution.
Paper coating contaminating the ink train Use low tack ink, low water setting, and low pressure setting.

Problem Cause Solution

TRAPPING
Cannot achieve good color coverage
Tack of inks out of sequence. Make sure inks are of successively decreasing tacks.
Strength of ink improperly balanced. Each succeeding ink should carry a heavier film for optimum trap.
Improper ink viscosities. In general each succeeding color requires a lower viscosity ink.
Hue error or grey balance not keyed to color separations. Have suppliers coordinate efforts.
Unequal press stability of links. Ink tacks up quicker than preceding ink. Consult ink manufacturer to coordinate stability of all ink color(s).
Ink contains additive that creates a film preventing succeeing ink layers from adhering. Consult ink manufacturer. See CRYSTALLIZATION.
Ink and water balance. See MOTTLED SOLIDS.
Poor ink release from blanket. Consult blanket and/or ink manufacturer.
Improper register causing poor appearance. See MISREGISTER.
Process color prints do not match supplied proofs. See INCONSISTENT COLOR REPRODUCTION No. 2.

Web Offset Printers

BLISERING BLOCKING DOT SHARPNES
INADEQUATE DRYING GLOSS HICKIES
MARKING MISREGISTER MISTING/SLINGING
MOTTLED SOLIDS PICKING/LINTING PILING
PLATE BINDING POOR RUB AND SCUFF RESISTANCE SCUMMING
ROLLER STRIPPING TINING/TONING TRAPPING
WEB BREAKS INK/ WATER BALANCE INK MILEAGE
INCONSISTENT COLOR REPRODUCTION  

Problem Cause Solution

BLISERING
A moisture explosion in the paper- looks like a bubble on both sides of web and generally in heavy coverage areas.

Over heat is too high. Reduce oven temperature. Consult ink manufacturer to provide ink that can be cured at a lower temperature.
Excess dwell time is oven. Correlate press speed. Web dwell time in dryer, and chill roll temperature to optimum performance levels.
Defect in paper causing excessive moisture content, improper density or base. Blistering may not occur the full machined reel. Run roll from different paper machine position. Run a substitute stock. Consult paper manufacture and reject if necessary.
Pigment strength of ink is too low, requiring more ink than normal to be carried in heavy coverage area. Consult ink manufacturer to adjust.

Problem Cause Solution

BLOCKING
Undesired adhesion between printed signatures or sheets in a bundle or load causing them to stick together.
Refer to INADEQUATE DRYING section of this guide.  

Problem Cause Solution

DOT SHARPNESS
Printed halftone areas appear muddied and shop higher values than the "Prog" proof show.
Too much form roller-to-plate, plate-to-blanket, or blanket -to-blanket pressure. Check setting and correct to proper pressure.
Doubled or slurred dots. Adjust plate - to - blanket pressure. Make sure blanket is secure. Check press for roller slippage are mechanical stability to high speeds.
Ink body is too long and is squashing at the point of impression. Consult ink manufacturer to provide stiffer ink.
Ink is too water receptive. Consult ink manufacturer.
Piling. Refer to PILING section of this guide.
Plate was not sharp enough to compensate for normal dot spread from film to plate to press. Have cameraman and plate maker cooperate in making sharper halftones, negatives, positives and plates.
Improper ink/water balance. Adjust ink an water settings. Consult ink manufacturer.

Problem Cause Solution


INADEQUATE DRYING
Printed halftone areas appear muddied and shop higher
values than the "Prog" proof show.


Dryer temperature too low to speed of web. Insufficient solvent being released from ink film. Increase dryer temperature to specification level.
Ink film thickness excessive. Run less ink or consult ink manufacturer to increase strengths for this purpose.
Inadequate evacuation of solvent vapors clinging to web as it leaves dryer. Consult ink manufacturer.
Different Pantane Color Formula Guides. Increase velocity of air in air knife scavenger at dryer exit.
Chill system not working properly; ink resins are not setting hard enough. Lower chill roll temperature. Caution : Watch for chill roll condensation.
Stock is not porous enough or has too high water content. Switch stock to correct porosity or water content.
PH/ conductivity of fountain solution is incorrect. Adjust ph/ conductivity to proper level. Refer to ink manufacturer.
Ink takes on too much water. Consult ink manufacturer for proper adjustment.
Plate dampening is uneven. Keep dampeners clean and free from accumulated dirt. Prevent draft, check windows, vents, and forced air systems.
Ink film is only surface dried is oven and still wet underneath. After chilling ink solvent will work its way toward surface causing set - off. Most likely to offer with heavier than normal ink film thickness, very nin absorbent stocks. On high oven temperature. Reduce speed of press. Adjust oven temperature.
Ink films do not try at normal dryer temperature. Consult ink manufacturer for inks that dry at low temperatures.

Problem Cause Solution

GLOSS

There is a decrease in the normal reflection of light from the dried ink surface whether observed visually, or red via glassmeter.
Paper too ink absorbent. Paper surface very rough and grainy. Paper has poor gloss. Consult paper manufacturer to obtain stock with more ink hold out. Obtain stock having a smooth surface. Obtain paper with better gloss.
Dryer temperature is too high. Consult ink manufacturer to obtain low temperature inks. Decrease press speed to allow decrease of oven temperature.
Press dampeners - too much water being introduced in to linking system. Cut back on amount of fountain solution used. Consult ink manufacturer to decrease water receptivity of ink.
Ink film thickness too low. Increase ink film thickness being carried on web.
Excessive ink vehicle penetration in to web. Reduction of heat in dryer. Increase press speed to reduce oven dwell time, maintain sufficient chilling capacity. Consult ink manufacturer, obtain inks with better hold - out.

Problem Cause Solution

HICKIES
Doughnut shaped or irregularly shaped white spots surrounding a small spot of ink.
Dried ink particles. Avoid dried ink skin when removing ink from cans or kit. Protect ink remaining in a can or kit from oxidation, drying and formation of ink skin by applying a sheer of paper or plastic on top of it. Clean the press throughly and remove all dried ink in the fountain or on the rollers before inking up the press. Prevent the ink in the ink fountain from mixing with dried ink around tie ink fountain edges. Prevent ink from caking on the ends of rollers by lubrication and manual washing. Use a leather covered or a grained rubber roller. This will pick up hickies that are passed on to the plate. Remove the leather- covered rollers and clean them thoroughly as needed.
Flakes of ink rollers. Recondition the rollers and drums. Replace if necessary.
Glazed rollers. Use one of the specially formulated glaze - removing materials or remove the form rollers, and alternately scurb the form rollers and the drums with pumice powder and ink solvent to remove the glaze.
Disintegration of dampener roller sleeves or rollers due to wear. Replace suspect roller sleeves or roller with new one.
Foreign particles ( dirt ) from ceiling have fallen in to press. Vacuum clean the ceiling and everything overhead where dirt can accumulate. Paint the ceiling if necessary, or hang plastic sheeting over the press to catch the falling particles. Use a leather covered or a grained rubber roller. This will pick up hickies that are passed on to the plate. Remove the leather covered rollers and clean them thoroughly as needed.
Loose paper dust on web. Install vacuum sheet cleaner. Consult paper manufacturer.

Problem Cause Solution

INCONSISTENT COLOR REPRODUCTION
Color hues when printed do not match proofs.
Paper proofed on is not the same as that being printed. Paper being printed is more absorbent. Adjust ink film thickness to that of the proof. Consult ink manufacturer to adjust hue and ink hold - out to match the proof on the actual paper being printed on. Consulate paper manufacturer to see if paper is available which more easily duplicates the paper proofed on.
Excessive heat in dryer results too much penetration of the ink resin, resulting in loss of gloss - ink is overdried. Reduce fryer temperature increase press speed.
Special, spot color does no match proof. Consult ink manufacturer's.

Problem Cause Solution

INK / WATER BALANCE
Frequent adjustments required on press to maintain print quality.
Excessive or insufficient dampening solution being run. Reduce or decrease dampener settings.
Fountain solution too weak or improperly mixed. Check pH/ Conductivity and adjust accordingly. Refer to ink manufacturer.
Improper dampening roller settings. Re - set rollers. Be sure dampener form rollers are driven the vibrator roller or not the plate.
Improper ink from roller settings. Conduct ink stripe test to check form roller pressure.
Improper ink fountain settings. Adjust the amount of ink at fountain. Allow adequate time for adjustment to take full effect.
Weak ink, i.e. low color strength. Consult ink manufacturer for proper adjustment.
Ink taking up too much water. Consult ink manufacturer.

Problem Cause Solution

INK MILEAGE
More ink used per impression than normal
Lack of control on color densities. Adjust color densities to minimum, consistent with satisfactory print quality.
Ink penetration in to stock too rapid. Consult ink manufacturer for ink with more hold - out change to less porous stock.
Improper ink and water balance. Reduce amount of water carried.
Low pigmented inks. Consult ink manufacturer for proper tinctorial strength.
Excessive waste at start - up of run. Improve start - up procedures.
Improper estimate of coverage from job to job. Establish ink usage history so that these figures can be used to more accurately predict ink usage.

Problem Cause Solution

MARKING

Streaks, tracks, or smudges on web due to mechanical contact.
Grater roller. Install grater roller with sharper points. Increase pigment strength of ink so as to decrease in ink film thickness Carrie on web.
Web bustle wheels. Move wheels so as to contact non image areas only. If moving wheels is not possible, apply teflon tape to lessen abrasiveness of wheel surface.
Improper it flow through oven causing web to flutter and make contact with oven apparatus. Consult oven manufacturer for proper adjustment or adjust web tension.
Chill role not cool enough. Reduce chill role temperature so that post chill role web temperature is 90 degree F or less. Recommended chill role water temperature is 72 -75 degree F. Caution : If chill roll are too cold, condensation can occur. Reduce oven temperature to mainimum necessary to get the web through chilling and press folding delivery operation.
Web temperature reached in the oven is not high enough to drive off sufficient ink solvents. If flame impingement drier used adjust flame tips to impinge properly. If high velocity forced air drier used, raise circulating air temperaturer in oven until making is eliminated. Caution : Remember paper will burn at 451 degree F and can scorch at lessen temperatures. Decrease press speed. Increase air velocity through oven as to remove air and vapor layer clinging to moving web. Consult ink manufacture to obtain faster drying ink.
Dryer does not have capacity to properly handle press speeds reached or type of work printed. Consult dryer manufacturer.
Paper is very absorbent, very little ink penetration occurs to provide basic for binding to paper. Consult paper manufacturer change paper.
Ink film thickness is too great. Raise air temperature circulating in dryer. Increase air velocity circulating to help remove solvent vapor layer. Consult ink manufacturer, change to faster drying inks.

Problem Cause Solution

MISREGISTER
In the press running direction and side to side, after the press has been ser for proper registration, trouble arises when some condition prevents consistently good register.
MISREGISTER IN THE PRESS RUNNING DIRECTION  
One or more pleats are cocked or are not properly set on there cylinder. Plates should be handled more carefully on bending jig.
One or more pleats are printing longer or shorter than the others. Transfer the packing from blanket to plate to shorten the print, or from plate to blanket to lengthen the print, of from plate to blanket to lengthen the print. Maintain good tension on the web.
Uneven blanket packing. If one of the printing units is no pulling the web fast enough, web tension between it and the following unit will built - up until the web snaps back, causing misregister. Adjust blanket packing until the draws between the suits are equal.
Web tension is too low; the higher the tension, the better the register Increase web tension in the infeed section of the press.
Web tension changes during run because infeed tension changes. Equip presses with a constant - tension infeed.
Ink at the point of impression is too high causing the web to follow the blanket more than normal. This momentarily increases the tension in localized areas as a result can effect running register. Increase web tension. Reduce press speed. Consult ink manufacturer for tack reduction of ink causing problem.
Paper pile on blanket changes blanket diameter. Wash blanket more frequently. Change to paper that is more moisture resistant.
Paper roll out of round or having flat areas therein. Constant - tension infeed will help. Increase distance traveled by the web between infeed and the first printing unit. Change to a roll that does not have problem.
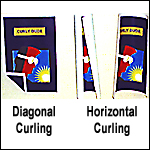
MISREGISTER SIDE - TO - SIDE ( More likely with wide webs 35+ inches):  
Non - uniform moisture across the web causes corrugation of roll, resulting inside - to - side misregister. Increase distance traveled by the web between the infeed and the first printing unit. The longer this distance and the higher the web tension, the more uniform the web will be. Use a pre heater on the infeed and the first printing unit to dry the paper, even out the moisture content and flatten the web. Equip press with a curved roller to spread and flatten the web.
Welts caused by unwrapping rolls in a high humidity area and allowing them to stand for a long time. These welts will occur no more than 25 mils in to roll. The small amount of corrugation will cause some side - to - side misregister just after splicing. Remove outer 25 miles of paper. Do not unwrap rolls until just before going to press.
Paper varies in calipaer across the web. Consult paper manufacturer.
Web has slack edges due to moisture pick - up while in the roll. Keep rolls from protected from atmospheric changes until they are mounted on the infeed and the web between the infeed stand. Increase distance traveled by the web between the infeed and the first printing unit in increase web tension, stretching the web tends to tighten slack edges. Equip the press with a curved roller on the infeed to spread and flatten the web. Adjust the eccentric - mounted infeed roller to balance edge tension.
Ink track too high at point of impression. Refer tip RUNNING DIRECTION MISREGISTER section of this guide. #6 under cause. Refer to RUNNING DIRECTION MISREGISTER section of this guide # 6 under solution.

Problem Cause Solution

MISTING / SLINGING

MISTING - Excessive amount of ink being thrown ink train rollers described as fine droplets.
SLINGING - Ink being thrown from rollers in filaments.

Too much ink on rollers.

Make press adjustment to decrease amount of ink carried or consult ink manfacture to increase ink strength and carry less ink or rollers.
Improper ink and water balance. Adjust ink and water balance to proper setting.
Ink is too long in body. Consult ink manufacturer.

Rollers are incorrectly set or in poor condition.

Rest roller based on manufacturer specification. Replace rollers if in poor condition.

Roller train too hot. Reduce temperature or increase flow of cooling water throw ink train rollers.

Problem Cause Solution

MOTTLED SOLIDS
Printed solid area is not uniform(smooth)ink appearance or density.

Stock has non - uniform surface formation.

Get better grade of paper. Consult ink manufacturer to provide weaker ink and minimize and penetrating tendencies.
Too much Printing pressure. Reduce printing pressure.
Improperly set ink from roller or roller ink poor conditions. Check condition and reset ink from roller to specification.
Improper ink and water balance. Adjust to paper ink and water balance.
Blanket has not been changed for a long time and has become worn and rough certain areas. Replace with a new blanket.
Poor ink transfer. Consult ink manufacturer.

Problem Cause Solution

PICKING/LINTING
PICKING - Lifting of the coating from coated stocks onto blankets, plates or rollers.
LINTING - Pulling fibers from uncoated stock.
Too much water reaching papers. Reduce dampener setting for proper performance.
Dampening solution concentration too high. Adjust dampening solution mix. Consult dampening solution manufacture.
Paper surface trash, coating dust, slitter or trimmer dust. Make tape pulls from blanket, consult paper manufacturer.
Base stock picks. If serious, reject paper, change to more lint or pick - resistant stock.
Pressure set too high for ink/ stock combination being used. Reduce impression pressure, repack to manufacturer specification.
Blankets is too high. Consult blanket manufacturer. Treat blanket or change it to a less tacky blanket. Check blanket wash.
Ink is too tacky for stock being run. PAPER: Refer to PICKING/ LINTING section of this guide. Consult ink manufacturer to lower tack of ink refer to PICKING/ LINTING section of this guide.

Problem Cause Solution

PILING
Build - up of paper coating lint, or ink on rollers, blankets or plates.
INK :  
Incase water logged. Reduce dampener setting. Consult ink manufacturer.
Incase poorly ground, contains a coarse, heavy pigment. Consult ink manufacturer. Have ink reworked or reformulated.

Problem Cause Solution

PLATE BINDING
(LOSS OF IMAGE) Part or all of image on plate does not take ink.
Improper packing of cylinders or roller not set correctly. Check specification and adjust if required.
Excessive amount of lint being deposited on place. Refer to PICKING/ LINTING section on this guide.
Excessive plate - to - blanket pressure causing plate wear. Re-set to specification. Use packing gauge to check pressure.
Improperly set ink and dampening form rollers. Roller could be too hard, check durometer. Also check setting; re- set if too much pressure exists.
Abrasive particles destroying image. Check ink grind, fountain solution, solvents, etc. Replace all contaminated material.
CHEMICAL:  
Too much acid in the fountain solution. Check pH/ conductivity and reduce acid to proper amount. Refer to Flint Corporation. Technical monograph TM84-5 on conductivity.
Too much gum in fountain solution. Re - etch plate and rub up image areas with press ink. Drain fountain solution and refill with tap water. If image returns, replace tap water with fountain solution containing less gum.
Plate cleaners and / or scratch removers have dried on plate image. Always rinse plate thoroughly and immediately after using such item.
Detergent remains or has somehow entered the fountain system. Make sure that all parts that comes in contact with cleaning detergent have been thoroughly rinsed before reinstalling in press.
Ink will not adhere to image area due to excess amount of fountain solution being accepted by the ink. Reduce dampener setting to minimum, if problem persist consult ink manufacturer.
Plate not completely developed. Plate was improperly developed with gum remaining on image area wash plate. If problem persist have plate remade.

Problem Cause Solution

POOR RUB AND SCUFF RESISTANCE
Printed ink film appears dry but exhibits poor rub and so scratch resistance when abraded.
Too much water runs on job or paper contains too much water. Reduce dampener setting. Change paper.
PH/ conductivity too high in fountain solution. Very high pH/ conductivity is indicated of too much acid in fountain solution which can retard or prevent drying of ink. Adjust pH/ conductivity according. Refer to flint ink corporation technical monograph TM84-5 on conductivity.
Ink not fully dried. Refer to INADEQUATE DRYING section of this guide.
Poor paper coating inergrity. Consult paper manufacturer.
Roughness of paper surface creates poor rub between unprinted paper surface and printed paper surface. ( i.e. some dull coat type stocks.) Consult ink manufacturer to provide ink with better rub resistance.
Too much ink. Lower level of ink carried.
Ink is not properly formulated for rub resistance. Consult ink manufacturer for adjustment.

Problem Cause Solution

SCUMMING
The non - image area of a lithographic plate accepting ink random area.
Low alcohol or alcohol substitute content in dampening system. Bring alcohol or alcohol substitute content of correct concentration. 2. 3.4.5.6.
Glazed blanket ink rollers, or dampening rollers. Clean thoroughly and recondition per manufacturer instructions.
Excessive printing pressure. Make on - press adjustment to proper pressure.
Ink spreading in to non - printing area. Consult ink manufacturer to assure ink is on - standard reformulate if necessary.
Plate improperly exposed to light after allowed to try. Desensitize or remake plate.
Improper ink/ water balance. Refer to INK/ WATER BALANCE. Section.

Problem Cause Solution


ROLLER STRIPPING

Rollers do not except ink.

Fountain solution too acid.

Check pH/ conductivity and gum concentration levels of fountain solution. Refer to flint ink corp. Technical Monograph TM 84-5 on conductivity.
Too much water being run. Reduce dampener setting.
Desensitized Mattel vibrator rollers. Clean rollers, copperas, wash thoroughly. Then ink rollers and wash again.
Glazed form roller. Remove rollers from press and deglaze as per manufacturer procedure. Rinse thoroughly.
Too much dampening solution being emuismed in ink. Consult ink and dampening solution manufacturer.

Problem Cause Solution

TINTING/ TONNING
Fine particles of ink adhering to non image areas of plate transmitted by press water dampener.
Ink bleeding in to fountain solution. Check concentration of alcohol or alcohol substitute in fountain solution. Consult ink manufacturer.
Improper fountain solution concentration. Check pH/ conductivity and adjust to proper concentration. Refer to flint ink corp. Technical Monograph TM84-5 on conductivity.
Too much pressure between plate and blanket. Check and re set to manufacture's specifications.
Improper setting of dampener or ink rollers. Check and re set to recommended manufacturer's specification.
Ink not sufficiently water resistant. Consult ink manufacturer.
Plate improperly exposed, developed. Check platemaking procedure; correct if necessary.

Problem Cause Solution

TRAPPING
Connot achieve good color balance or over all appearance.
Too much tack in relation to preceding ink. Consult ink manufacturer. Reduce tack of the ink that is not trapping properly.
Unequal press stability of inks. Ink tack up quicker than preceding ink. Consult ink manufacturer to adjust stability to be in line with previous color (s).
Ink strength not balanced properly. Consult ink manufacturer.
Inks contains additive that creates a film on top of it that will not allow succeeding ink layers to adhere to it when printed. Consult ink manufacturer.
Ink - water balance. Refer to MOTTLED SOLID section of this guide.
Poor ink release from blanket. Consult blanket and / or ink manufacturer.
Improper register causing poor appearance. Refer to MISTEGISTER section of this guide.

Problem Cause Solution

WEB BREAKS
Tearing of web as it travels through press - can occur infeed to cut - off to (1) paper defects, (2) press settings, or (3) ink.
Excessive tension on one or both edges of the web to loss of moisture and inkage. Keep rolls completely wrapped until ready to mount on roll stand. If the rolls are stored, make sure wrappings are undamaged.
Roll has dent or cut in end. If the dent is not deep, send or cut it out until edges of the paper are smooth. If the dent is deep, print down to the dent, stop the press, slab off the damaged portion of roll, resplice, and resume printing. If rolls are too badly damaged. Consult paper manufacturer.
Fiber cuts, hair cuts, wire holes, wrinkles, slime spots, foam spots, calendar cuts - any one of these can start a tear. If defects are numerous consult paper manufacturer.
Bad mill splices. If problem is extensive. The paper mill should be contacted.
PRESS :  
Web tension set too high. Decrease web tension.
Printing units or other press elements may be out of line. This is indicated if a proportionately large number of web breaks occur in one section of the press. An indication of misalignment of press elements is the presence of diagonal wrinkles in any span of web in the press. INK :
INK:
Have the press alignment checked and corrected if necessary.
Printing tack of ink is too high causing web to adhere to blanket and follow it causing a tear and subsequent web break. Consult ink manufacturer.
Body of ink is too long allowing drippage from fountain nip on to web below. Web will follow blanket causing break. Consult ink manufacturer.
Pigment strength of ink is too low causing ink fountain keys to be opened up too much. As a result ink will drip through ink fountain nip on to web below. Web will follow blanket causing break. Consult ink manufacturer.
Ink slinging. Consult MISTLING/ SLINGING section.

Digital Printers

TOO MOIST PAPER MOTTLINNG - TOO DRY PAPER MOTTLINNG - BAD PAPER FORMATION
MOTTLINNG - UNSUITABLE TRANSFER CURRENT(WHEN ADJUSTABLE) LINES,STREAKS AND BANDS -CRACKING LINES, STREAKS AND BANDS - LOW SCRATCH RESISTANCE
BACKGROUND NOISE SPOTS,BLISTERING - BLISTERING OF THE PRINTED SURFACE PAPER PROPERTIES AND PRINTING - CURLING
PAPER MANUFACTURING AND CONVERTING - WAVINESS AND SLACK EDGES PAPER MANUFACTURING AND CONVERTING - PAPER DUSTING  

Problem Cause Solution

TOO MOIST PAPER
This defect can be seen as a motting structure, with the defect diameter on the area of 1.5min, It can be observed most clearly on areas covered with multiple toner layers, like the solid green. If the paper is very moist the toner transfer efficiency and the print density can be reduced to a very low level (lower image). When printing two sided prints, the second side print quality is better than on the side printed first.
The paper is too moist and because of this too conductive in the toner transfer phase.
Keep the paper ream closed until the paper is used. Try another, unopened ream. The moisture level of the paper can be adjusted by the paper manufacturer to fit the other paper properties that effect the toner transfer efficiency.

Acclimatize the paper shipments in the printing room conditions with out opening the moisture barrier packaging, until the paper has reached room temperature.
With paper that is too moist it may be possible to enhance the print quality of a duplex job by printing the more critical side during the second pass, because paper loses moisture in the fuser.


Problem Cause Solution

MOTTLING - TOO DRY PAPER
seen mores clearly on the areas covered with multiple toner layers.
The paper is too dry and resistive in the toner transfer phase. Keep the paper reams closed until the paper is used. In dry condition the paper can loose too much moisture. Try another unopened ream.

With paper that is too dry it may be possible to enhance the print quality of duplecx job by printing the more critical side during the first pass.


Problem Cause Solution

MOTTLINNG - BAD PAPER FORMATION
Fomation relates to the degrees of uniformity of the distribution of the fiber in the sheet. Bad formation can be seen as a mottling pattern in the printed sheet. with some machine this mottling pattern may look similar to that created with paper that is too moist. The defect can be seen more clearly on areas covered with multiple solid color layers, like the solid green.
Because a sheet of paper that has a bad formation is clearly un - uniform, the resistively characteristics vary from spot to spot over the sheet. These local variation cause local difference in transfer efficiency over the sheet seen as mottling of specially solid tone areas.

To examine the formation of the sheet, hold it against a light and see if the sheet is uniform and well formed. Incase the sheet is irregular, the mottling can be related to bad formation. In this case another paper type should be tested.

If the moisture layer of the paper is too high, the defects related to bad formation become more severe. Because of this it is necessary to keep the paper reams closed until the paper is used.


Problem Cause Solution

MOTTLINNG - UNSUITABLE TRANSFER CURRENT( WHEN ADJUSTABLE)
In some electrophotography machine it is possible adjust the transfer current to suit the substrate used. Unsuitable level of transfer current may cause low transfer efficiency, or in some case toner already placed on the substrate to be moved from the sheet before the fusing phase. This type of problems can then be seen as mottling in specially those area that have multiple toner layers on top of each other, like for example on solid green.

The level of transfer current effect the print quality, as it is the parameter used in controlling the electric field applied to move the toner to the substrate. Try to optimize the transfer current by altering the transfer current in small steps and making test prints. Select the starting point based on a similar type and grammage paper printed earlier. When the paper is moist ( conductivity) it requires lower transfer current than when the same paper is dry (resistive). Keep the paper reams close until the paper is used.


Incase the paper is unsuitable for the process, for example because of vary bad formation, the solid color area print quality cannot be optimized to can excellent level.


Problem Cause Solution

LINES, STREAKS AND BANDS - CRACKING

The defect is visible as tiny ruptures at a fold. It is most common on coated grade and on high grammage papers. The defect is most visible when the folded area is printed.
The tensile strength of the fold decrease with decreasing moisture content of the paper, as shown in chart 5.1. Therefore cracking problem are more severe when the paper is folede when two dry, or against the fiber direction. Acclimatize printed sheets when possible and crease heavy grammage paper before folding. High grammage paper will be in most cases give problems in critical print jobs, if folded without creasing, specially if folded dry directly after printint.

If possible, the design of page layout should be done so that the folds are in line with the grain direction. Grain direction of paper can be determined by bending and sequare piece of paper. The paper is about twice as stiff against the grain than in the grain direction, so sheets will resist the bending more strongly when folded against the grain.


Problem Cause Solution

LINES, STREAKS AND BANDS - LOW SCRATCH RESISTANCE
The toner layers have not fixed properly. The printed image can have a very low scratch resistance.
There has not been a sufficient amount of fusing energy to melt the toner onto the paper. This may happen specially when high grammage papers are run with high process speeds.

Some paper grades may contain compounds negatively affectig toner adhesion. In case these compounds migrate to the surface of the paper, only a weak bond is formed between the toner layer and paper sheet, creating low scratch resistance. The surface energy of the paper surface should match the toner used, to enhance the adhesion.

In the liquid toner processes good adhesion is achieved when the chemical properties of the paper surface matches those of the liquid toner.

Check the machine manufacturer specifications on grammages that should be run from by pass tray and or with lower process speeds. In case where the defect is related to poor or unsuitable surface characteristics of the paper, another paper type should be used.

Problem Cause Solution

BACKGROUND NOISE
Single toner particles appear on unprinted areas, in quantities high enough to cause an overall brightness decrease of unprinted areas. Single particles can easily be seen with a loup
  Check the developer age and the service interval for the color units. For example, if the developers are overaged there can be unacceptably high level of backround toner.

Problem Cause Solution

SPOTS, BLISTERING - BLISTERING OF THE PRINTED SURFACE
Small blisters can appear on coated grades on heavy toner coverage areas. On a multicolor plane, the underlying process colors may be seen. The blistered toner surface has a reduced gloss level and a rough surface.
This defect is caused by the heat applied to the paper in the fuser. The water inside the paper evaporates too quickly through the coating and toner layers, causing the small blisters. Therefore this phenomenon is more likely to appear on heavy grammage multi coated papers that have very closed surface. The paper must be run with a lower process speed, so that the water doesnot evaporate too rapidly in the fusing phase. To avoid paper gaining moisture before printing, donot open the reams until the paper will be used. Incase the printing machine has options to either dry the paper before the toner transfer or to reduce the fusing temperature, these adjustments reduce blistering.

Try to avoid unnecessarily high toner coverages, for example by using under color removal and raplacing three and four color blacks with one color black when possible.


Problem Cause Solution

PAPER PROPERTIES AND PRINTING - CURLING
Severe curling of unprinted paper can deteriorate the runnability, especially in duplex printing. In some machines curling can also cause registration and other image quality problems. Curling of the printed sheets affects the visual appearance and hinders the finishing.
The change in humidity releases internal stresses in the paper and the result can be curling. This type of curling appears especially when the internal stress distribution of the paper is not even.

Curl of printed sheets can occur when on one side of the paper a large, high coverage toner layer is printed, and printed paper is left in an a moist environment. Paper sheet dimensions expand after printing as the sheets regains moisture from the air, this may cause curl when one side of the sheet is bound with the toner layer.

When paper related curling tendency is a continuous problem,another paper type should be tried. The paper should not be left unwrapped, to avoid the moisture change before printing. If possible, try to avoid high toner coverages on one side of the sheet with low grammage papers. The one - sided toner coverage related curl reduces in low humidity environment.

Problem Cause Solution

PAPER MANUFACTURING AND CONVERTING - WAVINESS AND SLACK EDGES

The edges of the pile of paper are wavy.
Wavy edges are generally caused by moisture pick up of paper exposed to ambient air containig high relative moisture. The edges gain moisture and expand more rapidly than the center of the pile. This problem can occur with unprinted paper, it is more likely to happen with a pile of printed paper. After the paper has dried in the electrophotographic printing process, the moisture difference between the air and the paper pile has increased. Unwrap the paper just before printing, and follow the storage and handling guidelines of your paper supplier.

The waviness of the printed sheets relaxes if it is possible to keep the printed paper in the room conditions until the moisture level has reached the equilibrium with the surrounding air. Unfortunately this may take a long time, in some cases even days. This process can be speeded up by dividing the printed batches in to smaller piles.


Problem Cause Solution

PAPER MANUFACTURING AND CONVERTING - PAPER DUSTING
As an offset printing also in electrophotographic processes the dusting (linting) of paper is an important quality criteria. In dry toner electrophotoghaphy, even if there is no tacky inks stressing paper, the static electricity and electrical charges applied are dominat for generaing dusting from paper.

The dusting will accumulate on the transfer and photoconductive belts causing print quality defects. Dusting may then shorten the problem free lifetime of these senstive components and increase the service costs.
To reduce these effects it is important to use papers with lower dusting influence. Since it is almost impossible to know before usage of paper which products are good in terms of dust and which are not, the printers should require from the supplier from dust quality evidence about the products to be used. The paper producer should have in the quality management procedure calibrated method to evaluate potential dust (in ream dust) and generated dust (process dust).

Grater roller. Install grater roller with sharper points. Increase pigment strength of ink so as to decrease in ink film thickness carried on web.
Web bustle wheels. Move wheels so as to contact non image areas only. If moving wheels is not possible, apply teflon tape to lessen abrasiveness of wheel surface.
Improper air flow through oven causing web to flutter and make contact with oven apparatus. Consult oven manufacturer for proper adjustment or adjust web tension.
Chill role no cool enough. Reduce chill role temperature so that post chill role web temperature is 900 F or less. Recommended chill role water temperature is 72 - 750 F. Caution : If chill roll are too cold, condensation can occur. Reduce oven temperature to minimum necessary to get the web through chilling and press folding delivery operation.
Web temperature reached in the oven is not high enough to drive off sufficient ink solvents. If flame impingement drier used adjust flame tips to impinge properly. If high velocity forced air drier used, raise circulating air temperature in oven until making is eliminated. Caution : Remember paper will burn it 4510 F and can scorch at lesser temperatures. Decrease press speed. Increase air velocity through oven as to remove air and vapor layer clinging to moving web. Consult ink manufacturer to obtain faster drying ink.
Dryer does not have capacity to properly handle press speeds reached or type of work printed. Consult dryer manufacturer.
Paper is very absorbent, very little ink penetration occurs to provide basic for binding to paper. Consult paper manufacturer, change paper.
Ink film thickness is too great. Raise air temperature circulating in dryer. Increase air velocity circulating to help remove solvent vapor layer. Consult ink manufacturer, change to faster drying inks.